How to make machines available
This article explains:
- How to create, delete, and configure machines
- How to clone machines
- How to examine machines and machine details
- How to use resource pools
- How to use machine storage
This article also provides a storage layouts reference.
Most of the day-to-day work of managing machines is covered here. Utilising machines to do work – for example, commissioning, testing, and deploying them – is discussed in How to deploy machines.
How to create, delete, and configure machines
This section shows you:
- How to add a machine manually
- How to add machines via a chassis
- How to manage attached USB and PCI devices
On the ‘Machines’ page of the web UI, click the ‘Add hardware’ button and then select ‘Machine’.
Fill in the form and hit ‘Save machine’. In this example, you are adding an IPMI machine:

The fields on the “Add machine” screen include the following items:
-
Machine name: This field is used to identify the machine to the user. It can be set to anything, though it is often set to the MAC address of the machine in question. This field is optional, in that MAAS will assign a unique, nonsense name if you leave it blank. You can change this nonsense name later, if desired.
-
Domain: This field sets the domain name of the domain managed by MAAS. It can be set to anything; MAAS assigns the domain name “maas” by default.
-
Architecture: This field refers to the architecture of the machine being added.
-
Minimum Kernel: This field supplies a drop-down of possible kernels available for deployment on this machine.
-
Zone: This field allows you to set the availability zone, selected from AZs that you have already created (if any).
-
Resource pool: This field allows you to set the resource pool for this machine, selected from pools you have already created (if any).
-
MAC Address: You should fill in this field with the MAC address of the machine you are adding. Note that the MAC address entered here must use a colon (“:”) separator, although some MAC addresses are written with dash (“-“) separators.
-
Power type: You must select the power type supported by the machine you are adding, and fill in additional required fields that appear. See Power management reference for details on the available power types and the relevant parameters for each type.
How to add machines via a chassis
You can use the chassis feature to add multiple machines at once. To do this, instead of selecting ‘Machine’ as above, choose ‘Chassis’ from the drop-down menu. In the following example, MAAS will add all available VMs from the given virsh address:

The required fields will change based on the type of chassis you choose.
NOTE: As with the manual method, the underlying machines will require netbooting.
How to manage attached USB and PCI devices
To delete PCI/USB devices from the machine in any machine state, via the CLI only, using the following command:
maas $PROFILE node-device delete $SYSTEM_ID $DEVICE_ID
where:
- $PROFILE = your user profile (e.g., “admin”)
- $SYSTEM_ID = the ID of the machine in question (e.g., “ngx7ry”)
- $DEVICE_ID = the ID of the device you want to delete
If the device is still present in the system, it will be recognised again (and thus “recreated”) when the machine is commissioned again.
Assume you have two machines available, like this:

Select the machine to which you want to clone configuration, and select “Clone from…”

Under “1. Select the source machine” – choose a machine from the attached list:

Under “2. Select what to clone”, choose “Network”, “Storage”, or both (here, we’ve chosen “Storage”):

Click “Clone to machine”. MAAS will report the status of the attempt.
How to examine machines and machine details
This section describes the various ways you can evaluate the health and status of your MAAS machines, using the machine list. It will show you:
- How to view the machine list
- How to view machine details
- How to find network info for a machine
- How to find storage info for a machine
- How to find commissioning logs
- How to find machine hardware & test logs
- How to find raw log output for a machine
- How to find a machine’s event logs
- How to find machine configuration info
To view the machine list, enter a command similar to this one:
maas $PROFILE machines read | jq -r '(["HOSTNAME","SYSID",
"POWER","STATUS","OWNER", "TAGS", "POOL","VLAN","FABRIC",
"SUBNET"] | (., map(length*"-"))),(.[] | [.hostname, .system_id,
.power_state, .status_name, .owner // "-",.tag_names[0] // "-",
.pool.name,.boot_interface.vlan.name,.boot_interface.vlan.fabric,
.boot_interface.links[0].subnet.name]) | @tsv' | column -t
This will return a relatively compact machine listing:
HOSTNAME      SYSID   POWER  STATUS     OWNER  TAGS                 POOL     VLAN      FABRIC    SUBNET
 --------      -----   -----  ------     -----  ----                 ----     ----      ------    ------
 lxd-vm-1      r8d6yp  off    Deployed   admin  pod-console-logging  default  untagged  fabric-1  10.124.141.0/24
 lxd-vm-2      tfftrx  off    Allocated  admin  pod-console-logging  default  untagged  fabric-1  10.124.141.0/24
 lxd-vm-3      grwpwc  off    Ready      -      pod-console-logging  default  untagged  fabric-1  10.124.141.0/24
 lxd-vm-4      6s8dt4  off    Deployed   admin  pod-console-logging  default  untagged  fabric-1  10.124.141.0/24
 lxd-vm-5      pyebgm  off    Allocated  admin  pod-console-logging  default  untagged  fabric-1  10.124.141.0/24
 lxd-vm-6      ebnww6  off    New        -      pod-console-logging  default  untagged  fabric-1
 libvirt-vm-1  m7ffsg  off    Ready      -      pod-console-logging  default  untagged  fabric-1  10.124.141.0/24
 libvirt-vm-2  kpawad  off    Ready      -      pod-console-logging  default  untagged  fabric-1  10.124.141.0/24
 libvirt-vm-3  r44hr6  error  Ready      -      pod-console-logging  default  untagged  fabric-1  10.124.141.0/24
 libvirt-vm-4  s3sdkw  off    Ready      -      pod-console-logging  default  untagged  fabric-1  10.124.141.0/24
 libvirt-vm-5  48dg8m  off    Ready      -      pod-console-logging  default  untagged  fabric-1  10.124.141.0/24
 libvirt-vm-6  bacx77  on     Deployed   admin  pod-console-logging  default  untagged  fabric-1  10.124.141.0/24
 ```

You can view various details for your machines, by changing the `jq` command as desired:

```nohighlight
maas admin machines read | jq -r '(["HOSTNAME","SYSID","POWER","STATUS",
"OWNER", "TAGS", "POOL", "VLAN","FABRIC","SUBNET"] | (., map(length*"-"))),
(.[] | [.hostname, .system_id, .power_state, .status_name, .owner // "-",
.tag_names[0] // "-", .pool.name,
.boot_interface.vlan.name, .boot_interface.vlan.fabric,
.boot_interface.links[0].subnet.name]) | @tsv' | column -t
This command, for example, will display machine power status, life-cycle status, and various networking parameters:
HOSTNAME      SYSID   POWER  STATUS     OWNER  TAGS                 POOL     VLAN      FABRIC    SUBNET
--------      -----   -----  ------     -----  ----                 ----     ----      ------    ------
lxd-vm-1      r8d6yp  off    Deployed   admin  pod-console-logging  default  untagged  fabric-1  10.124.141.0/24
lxd-vm-2      tfftrx  off    Allocated  admin  pod-console-logging  default  untagged  fabric-1  10.124.141.0/24
lxd-vm-3      grwpwc  off    Ready      -      pod-console-logging  default  untagged  fabric-1  10.124.141.0/24
lxd-vm-4      6s8dt4  off    Deployed   admin  pod-console-logging  default  untagged  fabric-1  10.124.141.0/24
lxd-vm-5      pyebgm  off    Allocated  admin  pod-console-logging  default  untagged  fabric-1  10.124.141.0/24
lxd-vm-6      ebnww6  off    New        -      pod-console-logging  default  untagged  fabric-1
libvirt-vm-1  m7ffsg  off    Ready      -      pod-console-logging  default  untagged  fabric-1  10.124.141.0/24
libvirt-vm-2  kpawad  off    Ready      -      pod-console-logging  default  untagged  fabric-1  10.124.141.0/24
libvirt-vm-3  r44hr6  error  Ready      -      pod-console-logging  default  untagged  fabric-1  10.124.141.0/24
libvirt-vm-4  s3sdkw  off    Ready      -      pod-console-logging  default  untagged  fabric-1  10.124.141.0/24
libvirt-vm-5  48dg8m  off    Ready      -      pod-console-logging  default  untagged  fabric-1  10.124.141.0/24
libvirt-vm-6  bacx77  on     Deployed   admin  pod-console-logging  default  untagged  fabric-1  10.124.141.0/24
To view output similar to the MAAS UI machine details page, execute the following shell script:
#!/bin/nohighlight

maas admin machine read r3rd6h | jq '.' > /tmp/machine-json
cat /tmp/machine-json | jq -r '([.hostname,.status_name,"| Power:",.power_state,"| Kernel:",.hwe_kernel,"| Owner:",.owner]) | @tsv' | column -t -o " " > /tmp/machine-details
cat /tmp/machine-json | jq -r '(["CPU:",.architecture,"/",.cpu_count,"core(s) /",.cpu_speed,"Mhz","| Type:",.hardware_info.cpu_model]) | @tsv' | column -t -o " " >> /tmp/machine-details
cat /tmp/machine-json | jq -r '(["Memory:",.memory,"MB | Storage:",.storage,"MB | Power type:",.power_type]) | @tsv' | column -t -o " " >> /tmp/machine-details
cat /tmp/machine-json | jq -r '(["Zone:",.zone.name,"| Resource pool:",.pool.name,"| Domain:",.domain.name]) | @tsv' | column -t -o " " >> /tmp/machine-details
cat /tmp/machine-json | jq -r '(["Tags:",.tag_names[]]) | @tsv' | column -t -o " " >> /tmp/machine-details
cat /tmp/machine-json | jq -r '(["SYSTEM Vendor:",.hardware_info.system_vendor,"| Product:",.hardware_info.system_product]) | @tsv' | column -t -o " " >> /tmp/machine-details
cat /tmp/machine-json | jq -r '([".......Vsn:",.hardware_info.system_version,"| Serial:",.hardware_info.system_serial]) | @tsv' | column -t -o " " >> /tmp/machine-details
cat /tmp/machine-json | jq -r '(["MAINBOARD Vendor:",.hardware_info.mainboard_vendor,"| Product:",.hardware_info.mainboard_product]) | @tsv' | column -t -o " " >> /tmp/machine-details
cat /tmp/machine-json | jq -r '(["..........Firmware:",.hardware_info.mainboard_firmware_vendor]) | @tsv' | column -t -o " " >> /tmp/machine-details
cat /tmp/machine-json | jq -r '(["..........Firmware Vsn:",.hardware_info.mainboard_firmware_version,"| Date:",.hardware_info.mainboard_firmware_date]) | @tsv' | column -t -o " " >> /tmp/machine-details
cat /tmp/machine-json | jq -r '(["NETWORK: Vendor:",.boot_interface.vendor]) | @tsv' | column -t -o " " >> /tmp/machine-details
cat /tmp/machine-json | jq -r '([".........Name:",.boot_interface.name,"| MAC:",.boot_interface.mac_address,"| Link speed:",.boot_interface.link_speed,"Mbps"]) | @tsv' | column -t -o " " >> /tmp/machine-details
cat /tmp/machine-json | jq -r '([".........Fabric:",.boot_interface.vlan.fabric,"| MAAS DHCP:",.boot_interface.vlan.dhcp_on,"| SR-IOV:",.boot_interface.sriov_max_vf]) | @tsv' | column -t -o " " >> /tmp/machine-details
cat /tmp/machine-details
This shell script should produce output similar to the following:
merry-cobra Deployed | Power: on | Kernel: ga-20.04 | Owner: admin
CPU: amd64/generic / 1 core(s) / 1600 Mhz | Type: Intel(R) Core(TM) i5-8265U CPU
Memory: 2048 MB | Storage: 8000.004096 MB | Power type: lxd
Zone: default | Resource pool: default | Domain: maas
Tags: pod-console-logging virtual
SYSTEM Vendor: QEMU | Product: Standard PC (Q35 + ICH9, 2009)
.......Vsn: pc-q35-5.2 | Serial: Unknown
MAINBOARD Vendor: Canonical Ltd. | Product: LXD
..........Firmware: EFI Development Kit II / OVMF
..........Firmware Vsn: 0.0.0 | Date: 02/06/2015
NETWORK: Vendor: Red Hat, Inc.
.........Name: enp5s0 | MAC: 00:16:3e:cc:17:58 | Link speed: 0 Mbps
.........Fabric: fabric-5 | MAAS DHCP: true | SR-IOV: 0
This section will explain:
- How to add a resource pool
- How to delete a resource pool
- How to add a node to a resource pool
- How to remove a node from a resource pool
- How to add a VM host to a resource pool
- How to remove a VM host from a resource pool
Administrators can manage resource pools on the Machines page in the web UI, under the Resource pools tab. Also note that all MAAS installations have a resource pool named “default.” MAAS automatically adds new machines to the default resource pool.
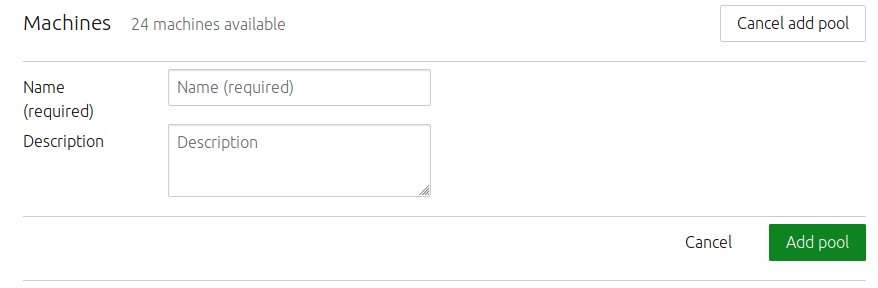
Use the Add pool button to add a new resource pool.
After giving your new pool a name and description, click the Add pool button:
To delete a resource pool, click the trashcan icon next to the pool.

NOTE: If you delete a resource pool, all machines that belong to that resource pool will return to the default pool.
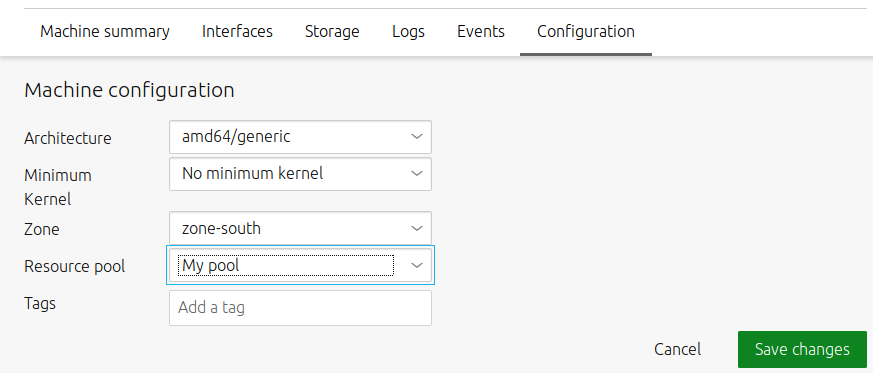
How to add a machine to a resource pool
To add a machine to a resource pool, on the Machines page, select the machine you want to add to the resource pool. Next, select the Configuration tab. Now select the resource pool and click the Save changes button.
How to remove a machine from a resource pool
To remove a machine from a resource pool, follow the same procedure you would use to add a machine, but select “default” as the new resource pool. This action will return the machine to the default resource pool.
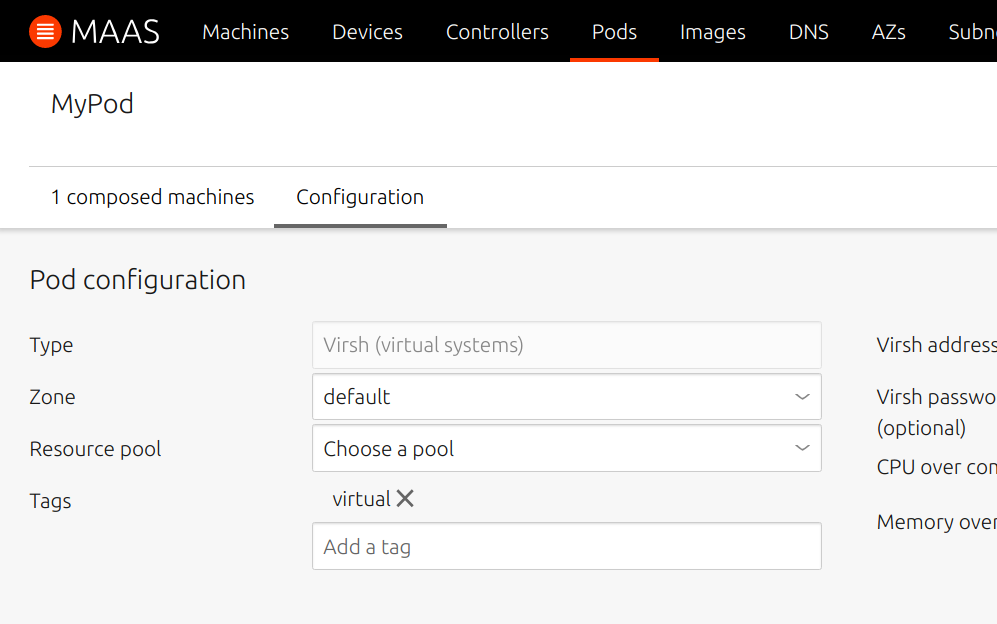
How to add a VM host to a resource pool
You can add a VM host to a resource pool when you create a new VM host, or you can edit a VM host’s configuration:
How to remove a VM host from a resource pool
To remove a VM host from a resource pool, follow the same procedure you would use to add a VM host to a resource pool, except select “default” as the new resource pool. This action will return the machine to the default resource pool.
This section will explain:
- How to set global storage layouts
- How to set per-machine storage layouts
- How to specify conditional erasure types
- How to erase disks
- How to manage block devices
- How to manage partitions
- How to manage VMFS datastores
- How to define custom storage layouts
How to set global storage layouts
Layouts can be set globally and on a per-machine basis.
NOTE: The new default will only apply to newly-commissioned machines.
How to set per-machine storage layouts
An administrator can change the layout for a single machine as well as customise that layout providing this is done while the machine has a status of ‘Ready’. This is only possible via the CLI: to see how, click the “CLI” option for your version and delivery method above.
NOTE: Only an administrator can modify storage at the block device level (providing the machine has a status of ‘Ready’).
How to set the default erasure configuration
A default erasure configuration can be set on the ‘Settings’ page by selecting the ‘Storage’ tab.
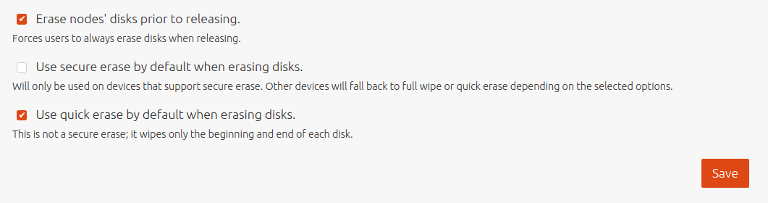
If option ‘Erase machines’ disks prior to releasing’ is chosen then users will be compelled to use disk erasure. That option will be pre-filled in the machine’s view and the user will be unable to remove the option.
With the above defaults, the machine’s view will look like this when the Release action is chosen:

Where ‘secure erase’ and ‘quick erase’ can then be configured by the user.
How to define custom storage layouts
MAAS 3.1 allows you to define a custom storage layout for a machine, via a custom commissioning script. You must upload a script which conforms to the following rules:
- it must run after the
40-maas-01-machine-resourcesscript and before the50-maas-01-commissioningone, so it should have a name that starts with anything between41-and49-. This ensures the script can access the JSON file created by the former which provides info about the machine hardware and network resources. In addition, the custom script can directly inspect the machine it’s running on to determine how to configure storage. - it can read machine hardware/network information from the JSON file at the path specified by
$MAAS_RESOURCES_FILE - it must output a JSON file at the path specified by
$MAAS_STORAGE_CONFIG_FILEwith the desired storage layout - names of disks provided in the custom layout must match the ones detected by MAAS and provided in the resources file.
Configuration format
The configuration contains two main sections:
- layout, which lists the desired storage layout in terms of disks and volumes, along with their setup (partitions, volumes, …).
This consists of a dictionary of device names and their configuration. Each device must have a type property (see below for supported types).
- mounts, which lists the desired filesystem mount points.
As an example:
"mounts": {
  "/": {
    "device": "sda2",
    "options": "noatime"
  },
  "/boot/efi": {
    "device": "sda1"
  },
  "/data": {
    "device": "raid0"
  }
}
A complete $MAAS_STORAGE_CONFIG_FILE would look like this:
{
    "layouts": {
        "sda": {
           ...
        },
        "raid0": {
           ...
        },
        ...
    },
    "mounts": {
       "/": {
           ...
       },
       ...
    }
}
The following device types are supported in the "layout" section:
Disk
"sda": {
  "type": "disk",
  "ptable": "gpt",
  "boot": true,
  "partitions": [
    {
      "name": "sda1",
      "fs": "vfat",
      "size": "100M"
      "bootable": true,
    }
  ]
}
A disk entry defines a physical disk.
The following details can be specified:
- the partition table type (ptable), which can be gpt or mbr
- whether it should be selected as boot disk
- optionally, a list of partitions to create, with their size and filesystem type (fs)
LVM
"lvm0": {
  "type": "lvm",
  "members": [
    "sda1",
    "sdb1",
  ],
  "volumes": [
    {
      "name": "data1",
      "size": "5G",
      "fs": "ext4"
    },
    {
      "name": "data2",
      "size": "7G",
      "fs": "btrfs"
    }
  ]
}
An lvm entry defines a VG (volume group) composed by a set of disks or partitions (listed as members). Optionally it’s possible to specify the the LVs (logical volumes) to create.
Those are defined similarly to partitions, with a name and size (and optionally the filesystem).
Bcache
"bcache0": {
  "type": "bcache",
  "cache-device": "sda",
  "backing-device": "sdf3",
  "cache-mode": "writeback",
  "fs": "ext4"
}
A bcache entry must specify a device to use as cache and one to use as storage. Both can be either a partition or a disk.
Optionally the cache-mode for the Bcache can be specified.
RAID
"myraid": {
  "type": "raid",
  "level": 5,
  "members": [
    "sda",
    "sdb",
    "sdc",
  ],
  "spares": [
    "sdd",
    "sde"
  ],
  "fs": "btrfs"
A raid entry defines a RAID with a set of member devices.
Spare devices can also be specified.
Configuration examples
Here’s a few examples of custom storage layout configurations that a script could output to the $MAAS_STORAGE_CONFIG_FILE. The examples assumes that the machine has 5 disks (named sda to sde).
Note that there’s no need to add entries for those devices in the layout section if the disks are not explicitly partitioned, but just used by other devices (e.g. RAID or LVM).
Simple single-disk layout with GPT partitioning
{
  "layout": {
    "sda": {
      "type": "disk",
      "ptable": "gpt",
      "boot": true,
      "partitions": [
        {
          "name": "sda1",
          "fs": "vfat",
          "size": "500M",
          "bootable": true
        },
        {
          "name": "sda2",
          "size": "5G",
          "fs": "ext4"
        },
        {
          "name": "sda3",
          "size": "2G",
          "fs": "swap"
        },
        {
          "name": "sda4",
          "size": "120G",
          "fS": "ext4"
        }
      ]
    }
  },
  "mounts": {
    "/": {
      "device": "sda2",
      "options": "noatime"
    },
    "/boot/efi": {
      "device": "sda1"
    },
    "/data": {
      "device": "sda4"
    },
    "none": {
      "device": "sda3"
    }
  }
}
In the mounts section, options for mount points can be specified. For swap, an entry must be present (with any unique name that doesn’t start with a /), otherwise the swap will be created but not activated.
RAID 5 setup (with spare devices)
{
  "layout": {
    "storage": {
      "type": "raid",
      "level": 5,
      "members": [
        "sda",
        "sdb",
        "sdc"
      ],
      "spares": [
        "sdd",
        "sde"
      ],
      "fs": "btrfs"
    }
  },
  "mounts": {
    "/data": {
      "device": "storage"
    }
  }
}
Both full disks and partitions can be used as RAID members.
LVM with pre-defined volumes
{
  "layout": {
    "storage": {
      "type": "lvm",
      "members": [
        "sda",
        "sdb",
        "sdc",
        "sdd"
      ],
      "volumes": [
        {
          "name": "data1",
          "size": "1T",
          "fs": "ext4"
        },
        {
          "name": "data2",
          "size": "2.5T",
          "fs": "btrfs"
        }
      ]
    }
  },
  "mounts": {
    "/data1": {
      "device": "data1"
    },
    "/data2": {
      "device": "data2"
    }
  }
}
If no volumes are specified, the volume group is still created.
Bcache
{
  "layout": {
     "data1": {
      "type": "bcache",
      "cache-device": "sda",
      "backing-device": "sdb",
      "cache-mode": "writeback",
      "fs": "ext4"
    },
    "data2": {
      "type": "bcache",
      "cache-device": "sda",
      "backing-device": "sdc",
      "fs": "btrfs"
    }
  },
  "mounts": {
    "/data1": {
      "device": "data1"
    },
    "/data2": {
      "device": "data2"
    }
  }
}
The same cache set can be used by different bcaches by specifying the same backing-device for them.
LVM on top of RAID with Bcache
{
  "layout": {
    "bcache0": {
      "type": "bcache",
      "backing-device": "sda",
      "cache-device": "sdf"
    },
    "bcache1": {
      "type": "bcache",
      "backing-device": "sdb",
      "cache-device": "sdf"
    },
    "bcache2": {
      "type": "bcache",
      "backing-device": "sdc",
      "cache-device": "sdf"
    },
    "bcache3": {
      "type": "bcache",
      "backing-device": "sdd",
      "cache-device": "sdf"
    },
    "bcache4": {
      "type": "bcache",
      "backing-device": "sde",
      "cache-device": "sdf"
    },
    "raid": {
      "type": "raid",
      "level": 5,
      "members": [
        "bcache0",
        "bcache1",
        "bcache2"
      ],
      "spares": [
        "bcache3",
        "bcache4"
      ]
    },
    "lvm": {
      "type": "lvm",
      "members": [
        "raid"
      ],
      "volumes": [
        {
          "name": "root",
          "size": "10G",
          "fs": "ext4"
        },
        {
          "name": "data",
          "size": "3T",
          "fs": "btrfs"
        }
      ]
    }
  },
  "mounts": {
   "/": {
      "device": "root"
    },
    "/data": {
      "device": "data"
    }
  }
}
The RAID is created by using 5 bcache devices, each one using a different disk and the same SSD cache device. LVM is created on top of the RAID device and volumes are then created in it, to provide partitions.
There are three layout types:
- Flat layout
- LVM layout
- bcache layout
The layout descriptions below will include the EFI partition. If your system is not using UEFI, regard sda2 as sda1 (with an additional 512 MB available to it).
With the Flat layout, a partition spans the entire boot disk. The partition is formatted with the ext4 filesystem and uses the / mount point:
| Name | Size | Type | Filesystem | Mount point |
|---|---|---|---|---|
| sda | - | disk | ||
| sda1 | 512 MB | part | FAT32 | /boot/efi |
| sda2 | rest of sda | part | ext4 | / |
The following three options are supported:
-
boot_size: Size of the boot partition on the boot disk. Default is 0, meaning not to create the boot partition. The ‘/boot’ will be placed on the root filesystem. -
root_device: The block device on which to place the root partition. The default is the boot disk. -
root_size: Size of the root partition. Default is 100%, meaning the entire size of the root device.
The LVM layout creates the volume group vgroot on a partition that spans the entire boot disk. A logical volume lvroot is created for the full size of the volume group; is formatted with the ext4 filesystem; and uses the / mount point:
| Name | Size | Type | Filesystem | Mount point |
|---|---|---|---|---|
| sda | - | disk | ||
| sda1 | 512 MB | part | FAT32 | /boot/efi |
| sda2 | rest of sda | part | lvm-pv(vgroot) | |
| lvroot | rest of sda | lvm | ext4 | / |
| vgroot | rest of sda | lvm |
The following six options are supported:
boot_size: Size of the boot partition on the boot disk. Default is 0, meaning not to create the boot partition. The ‘/boot’ will be placed on the root filesystem.root_device: The block device on which to place the root partition. The default is the boot disk.root_size: Size of the root partition. Default is 100%, meaning the entire size of the root device.vg_name: Name of the created volume group. Default isvgroot.lv_name: Name of the created logical volume. Default islvroot.lv_size: Size of the created logical volume. Default is 100%, meaning the entire size of the volume group.
bcache storage layout reference
A bcache layout will create a partition that spans the entire boot disk as the backing device. It uses the smallest block device tagged with ‘ssd’ as the cache device. The bcache device is formatted with the ext4 filesystem and uses the / mount point. If there are no ‘ssd’ tagged block devices on the machine, then the bcache device will not be created, and the Flat layout will be used instead:
| Name | Size | Type | Filesystem | Mount point |
|---|---|---|---|---|
| sda | - | disk | ||
| sda1 | 512 MB | part | FAT32 | /boot/efi |
| sda2 | rest of sda | part | bc-backing | |
| sdb (ssd) | - | disk | ||
| sdb1 | 100% of sdb | part | bc-cache | |
| bcache0 | per sda2 | disk | ext4 | / |
The following seven options are supported:
boot_size: Size of the boot partition on the boot disk. Default is 0, meaning not to create the boot partition. The ‘/boot’ will be placed on the root filesystem.root_device: The block device upon which to place the root partition. The default is the boot disk.root_size: Size of the root partition. Default is 100%, meaning the entire size of the root device.cache_device: The block device to use as the cache device. Default is the smallest block device tagged ssd.cache_mode: The cache mode to which MAAS should set the created bcache device. The default iswritethrough.cache_size: The size of the partition on the cache device. Default is 100%, meaning the entire size of the cache device.cache_no_part: Whether or not to create a partition on the cache device. Default is false, meaning to create a partition using the givencache_size. If set to true, no partition will be created, and the raw cache device will be used as the cache.
vmfs6 storage layout reference
VMFS6 storage layout reference
The VMFS6 layout is used for VMware ESXi deployments only. It is required when configuring VMware VMFS Datastores. This layout creates all operating system partitions, in addition to the default datastore. The datastore may be modified. New datastores may be created or extended to include other storage devices. The base operating system partitions may not be modified because VMware ESXi requires them. Once applied another storage layout must be applied to remove the operating system partitions.
| Name | Size | Type | Use |
|---|---|---|---|
| sda | - | disk | |
| sda1 | 3 MB | part | EFI |
| sda2 | 4 GB | part | Basic Data |
| sda3 | Remaining | part | VMFS Datastore 1 |
| sda4 | - | skipped | |
| sda5 | 249 MB | part | Basic Data |
| sda6 | 249 MB | part | Basic Data |
| sda7 | 109 MB | part | VMware Diagnostic |
| sda8 | 285 MB | part | Basic Data |
| sda9 | 2.5 GB | part | VMware Diagnostic |
The following options are supported:
-
root_device: The block device upon which to place the root partition. Default is the boot disk. -
root_size: Size of the default VMFS Datastore. Default is 100%, meaning the remaining size of the root disk.
Blank storage layout reference
The blank layout removes all storage configuration from all storage devices. It is useful when needing to apply a custom storage configuration.
NOTE: Machines with the blank layout applied are not deployable; you must first configure storage manually.