How to troubleshoot MAAS
This article may help you deal with some common problems. It is organised by topic:
- Find and fix a leaked MAAS admin API key
- Networking issues
- Machine life-cycle failures
- Custom image creation problems
Find and fix a leaked MAAS admin API key
MAAS hardware sync may leak the MAAS admin API key. The simple solution for this is to:
- Rotate all admin tokens
- Re-deploy all machines that have hardware sync enabled
For users who don’t want to re-deploy, the following instructions explain how to manually swap the token.
Manually swapping the MAAS admin API token
Check if you have any machines with Hardware Sync enabled. The easiest way to do this is a database query:
select system_id
from maasserver_node
where enable_hw_sync = true;
On each of the reported machines there might be a leaked API key that belongs to the user with admin permissions. This will show only machines that do exist now. It is possible that such machines existed before, but were removed. We still do recommend you to rotate API keys.
Here, on one of the machines, we have a leaked API key PMmKvCw26reY7SaDet:g5rY7FNDu2ZDKER5zL:pNAHKcpR7eLWA6g2RSxrqdgSXEKgTAMT:
cat /lib/systemd/system/maas_hardware_sync.service

[Unit]
Description=MAAS Hardware Sync Service
Documentation=<https://maas.io>
Wants=maas_hardware_sync.timer
After=network.target

[Service]
Type=oneshot
ExecStartPre=/usr/bin/wget -O /usr/bin/maas-run-scripts <http://10.100.0.10:5248/MAAS/maas-run-scripts>
ExecStartPre=/bin/chmod 0755 /usr/bin/maas-run-scripts
ExecStartPre=/usr/bin/maas-run-scripts get-machine-token\
    '<http://10.100.0.10:5248/MAAS'\>
    'PMmKvCw26reY7SaDet:g5rY7FNDu2ZDKER5zL:pNAHKcpR7eLWA6g2RSxrqdgSXEKgTAMT'\
    knt4rm\
    /tmp/maas-machine-creds.yml
ExecStart=/usr/bin/maas-run-scripts report-results --config /tmp/maas-machine-creds.yml

[Install]
WantedBy=multi-user.target
Just to ensure this token actually belongs to an admin account, we can do another database query:
select u.username, u.email
from auth_user u
left join piston3_consumer c
on u.id = c.user_id
-- we need only the consumer key of the token. token.split(":")[0]
where key = 'PMmKvCw26reY7SaDet';
You should login into MAAS UI with an account owning a leaked API key, find a leaked API key and remove it. This is the most convinient way; it guarantees that all steps will be audited and all caches will be reset. After API key is removed, MAAS CLI will stop working (if you were using the same token), so you will need to go through setting up the CLI credentials again.
The hardware sync feature will stop working as well. Here are two options:
- Redeploy the machine, so it will use the new systemd template
- Manually create a credentials file and modify
/lib/systemd/system/maas_hardware_sync.serviceto match
The following networking issues may be creating problems for you:
- Adding overlapping subnets in fabric can break deployments
- Need to reconfigure server IP address
- Network boot an IBM Power server
- Resolve MAAS/LXD DNS & DHCP conflicts/network issues
Please feel free to add other issues and solutions, if you have them.
Adding overlapping subnets in fabric can break deployments
Characteristic failure: A machine performs PXE boot, then gets trapped in a boot loop, causing deployment to fail.
MAAS does not currently prevent you from creating overlapping subnets, for example:
- subnet 1 = 192.168.48.0/24
- subnet 2 = 192.168.48.0/22
This can break deployments, because the controllers can’t reliably determine which subnet should get a packet destined for one of the overlapping addresses. The IP range of one subnet should be unique compared to every other subnet on the same segment.
At least one way to cause this error is to edit a subnet in the netplan file. MAAS will add the updated subnet, but may not drop the existing subnet, causing overlap. You can fix this by deleting the subnet you do not want from the Web UI.
If you have a machine that PXE boots, but then fails deployment, either in an infinite boot loop or some unspecified failure, check your subnets to be sure you do not have overlap. If so, delete the outdated subnet.
Need to reconfigure server IP address
If you made a mistake during setup or you just need to reconfigure your MAAS server, you can simply run the setup again:
sudo dpkg-reconfigure maas-region-controller
Network booting IBM Power servers
Some IBM Power server servers have OPAL firmware which uses an embedded Linux distribution as the boot environment. All the PXE interactions are handled by Petitboot, which runs in the user space of this embedded Linux rather than a PXE ROM on the NIC itself.
When no specific interface is assigned as the network boot device, petitboot has a known issue which is detailed in LP#1852678↗, specifically comment #24, that can cause issues when deploying systems using MAAS, since in this case all active NICs are used for PXE boot with the same address.
So, when using IBM Power servers with multiple NICs that can network boot, it’s strongly recommended to configure just a single
Resolve DNS conflicts between LXD and MAAS
If you get into a situation where MAAS and LXD are both managing DNS on your MAAS network, there’s a simple fix. You can turn off LXD’s DNS management with the following command:
lxc network set $LXD_BRIDGE_NAME dns.mode=none
You should also disable DHCP on IPv4 and IPv6 withing LXD:
lxc network set $LXD_BRIDGE_NAME ipv4.dncp=false
lxc network set $LXD_BRIDGE_NAME ipv6.dhcp=false
Once you’ve done this, you can check your work with the following command:
lxc network show $LXD_BRIDGE_NAME
When attempting to run a machine through its life-cycle, you may have encountered one of these issues:
- Nodes hang on “Commissioning”
- Node deployment fails
- Nodes fail to PXE boot
- Can’t log in to node
- "File not found" when creating commissioning or node script with MAAS CLI
- Can’t login to machine after deployment
Please feel free to add other issues and solutions, if you have them.
Various parts of MAAS rely on OAuth to negotiate a connection to nodes. If the current time reported by the hardware clock on your node differs significantly from that on the MAAS server, the connection will not be made.
SOLUTION: Check that the hardware clocks are consistent, and if necessary, adjust them. This can usually be done from within the system BIOS, without needing to install an OS.
Possible Cause: Network drivers
Sometimes the hardware can boot from PXE, but fail to load correct drivers when booting the received image. This is sometimes the case when no open source drivers are available for the network hardware.
SOLUTION: The best fix for this problem is to install a Linux-friendly network adaptor. It is theoretically possible to modify the boot image to include proprietary drivers, but it is not a straightforward task.
When deployment fails the Rescue mode action can be used to boot ephemerally into the node, followed by an investigation.
As an example, an improperly configured PPA was added to MAAS which caused nodes to fail deployment. After entering Rescue mode and connecting via SSH, the following was discovered in file /var/log/cloud-init-output.log:
2016-11-28 18:21:48,982 - cc_apt_configure.py[ERROR]: failed to add apt GPG Key
to apt keyring
Traceback (most recent call last):
  File "/usr/lib/python3/dist-packages/cloudinit/config/cc_apt_configure.py",
line 540, in add_apt_key_raw
    util.subp(['apt-key', 'add', '-'], data=key.encode(), target=target)
  File "/usr/lib/python3/dist-packages/cloudinit/util.py", line 1836, in subp
    cmd=args)
cloudinit.util.ProcessExecutionError: Unexpected error while running command.
Command: ['apt-key', 'add', '-']
Exit code: 2
Reason: -
Stdout: ''
Stderr: 'gpg: no valid OpenPGP data found.\n'
In this instance, the GPG fingerprint was used instead of the GPG key. After rectifying this oversight, nodes were again able to successfully deploy.
Possible Cause: Using an incorrectly
configured VM
Some virtual machine setups include emulation of network hardware that does not support PXE booting, and in most setups, you will need to explicitly set the VM to boot via PXE.
SOLUTION: Consult the VM docs for details on PXE booting.
If you are using MAAS in a setup with an existing DHCP, DO NOT SET UP THE MAAS DHCP SERVER as this will cause no end of confusion to the rest of your network and most likely won’t discover any nodes either.
SOLUTION: You will need to configure your existing DHCP server to point to the MAAS server.
Sometimes you may wish to log in directly to a node on your system. If you have set up Juju and MAAS, the node will automatically have SSH authentication enabled (and public keys installed) allowing you to log in. There is also an option in the MAAS web interface to add new SSH keys to the nodes (via Preferences in the drop down menu which appears when clicking your username in the top-right of the page).
"File not found" when creating commissioning or node script with MAAS CLI
When creating a commissioning script with the MAAS CLI, like this:
maas $PROFILE commissioning-scripts create name=scriptname content@=/tmp/filename
you may receive a “file not found” error:
[Errno 2] No such file or directory: '/tmp/filename'
There are two possible sources of the error:
-
You did not actually type the filename correctly, or the file does not exist in
/tmp. Check the spelling and make sure the file is actually present in/tmp(for example). -
You are using the snap version of MAAS. When using the MAAS snap, you may not use
/tmpdue to confinement rules. Move the file to/optor/home/myhomdirand try again.
In fact, trying to upload the script from any directory owned by root will give a similar error.
Also note that commissioning-scripts is deprecated and may be removed at some future time. Use the form node-scripts instead; consult the MAAS CLI built-in help for details.
Can’t login to machine after deployment
When everything seems to be right about your machine deployment, but you can’t login, there’s a chance you might not be using the right username. You may have added your personal SSH key to MAAS, but your corresponding login doesn’t seem to work; that’s because the logins for the machines are generally related to the operating system, e.g.:
-
For machines deploying Ubuntu, the username is
ubuntu, and the login would beubuntu@$MACHINE_IP. -
For machines deploying CentOS 7, the username is
centos, and the login would becentos@$MACHINE_IP. -
For machines deploying CentOS 8, the username is
cloud-user, and the login would becloud-user@$MACHINE_IP.
Note there is a trick for determining the correct machine login, which works on many different versions of Linux. If you attempt to ssh root@$MACHINE_IP, this will fail, but often tells you which user you should be using.
Custom image creation problems
You may have experienced these errors when trying to create custom images for MAAS:
Please feel free to add other issues and solutions, if you have them.
You might attempt to run packer and receive the following error:
stormrider@neuromancer:~$ packer
Command 'packer' not found, but can be installed with:
sudo snap install packer  # version 1.0.0-2, or
sudo apt  install packer  # version 1.6.6+ds1-4
See 'snap info packer' for additional versions.
More likely, you attempt a make and receive this error:
stormrider@neuromancer:~/mnt/Dropbox/src/git/packer-maas/ubuntu$ make
sudo rm -f -rf output-qemu custom-ubuntu*.gz
cp -v /usr/share/OVMF/OVMF_VARS.fd OVMF_VARS.fd
'/usr/share/OVMF/OVMF_VARS.fd' -> 'OVMF_VARS.fd'
sudo PACKER_LOG=1 packer build ubuntu-lvm.json && reset
sudo: packer: command not found
make: *** [Makefile:21: custom-ubuntu-lvm.dd.gz] Error 1
rm OVMF_VARS.fd
In both cases, the problem is the same: packer has not been installed. You can fix it by following these instructions↗.
No rule to make target …OVMF_VARS.fd
If you encounter an error like this:
stormrider@neuromancer:~/mnt/Dropbox/src/git/packer-maas/ubuntu$ make
sudo rm -f -rf output-qemu custom-ubuntu*.gz
make: *** No rule to make target '/usr/share/OVMF/OVMF_VARS.fd', needed by 'OVMF_VARS.fd'.  Stop.
then you have forgotten to install a needed dependency↗.
If you encounter an error such as this one:
2022/06/04 17:04:47 machine readable: error-count []string{"1"}
==> Some builds didn't complete successfully and had errors:
2022/06/04 17:04:47 machine readable: qemu,error []string{"Failed creating Qemu driver: exec: \"qemu-img\": executable file not found in $PATH"}
==> Builds finished but no artefacts were created.
Build 'qemu' errored after 880 microseconds: Failed creating Qemu driver: exec: "qemu-img": executable file not found in $PATH
then you have forgotten to install a needed dependency↗.
Finally, you may be facing an issue which doesn’t fit into any category, such as one of these:
- Subarchitecture error thrown by django
- Forgot MAAS administrator password
- Can’t find MAAS web UI
- Backdoor image login
- Migrate an existing snap installation to use a local PostgreSQL server
- Manually export the MAAS database
- Try jq recipes using the CLI
Please feel free to add other issues and solutions, if you have them.
Subarchitecture error thrown by django
Occasionally, you may encounter an error similar to this one:
django.core.exceptions.ValidationError: ['Subarchitecture(<value>) must be generic when setting hwe_kernel.']
One potential solution for this problem is to specify a different commissioning kernel, such as upgrading from Xenial to Focal, etc.
Forgot MAAS administrator password
As long as you have sudo privileges the maas command can be used to change the password for a MAAS administrator on the MAAS region controller:
sudo maas changepassword $PROFILE
where $PROFILE is the name of the user.
By default, the web UI is located at http://<hostname>:5240/MAAS/. If you can’t access it, there are a few things to try:
- Check that the web server is running - By default the web interface uses Apache, which runs under the service name apache2. To check it, on the MAAS server box you can run
sudo /etc/init.d/apache2 status. - Check that the hostname is correct - It may seem obvious, but check that the hostname is being resolved properly. Try running a browser (even a text mode one like
elinks) on the same box as the MAAS server and navigating to the page. If that doesn’t work, tryhttp://127.0.0.1:5240/MAAS/, which will always point at the local server. - If you are still getting “404 - Page not found” errors, check that the MAAS web interface has been installed in the right place. There should be a file present called
/usr/share/maas/maas/urls.py.
Ephemeral images are used by MAAS to boot nodes during commissioning, as well as during deployment. By design, these images are not built to be edited or tampered with, instead they’re used to probe the hardware and launch cloud-init↗.
However, if you find yourself with no other way to access a node, especially if a node fails during commissioning, Linux-based ephemeral images can be modified to enable a backdoor that adds or resets a user’s password. You can then login to check the cloud-init logs, for example, and troubleshoot the problem.
As images are constantly updated and refreshed, the backdoor will only ever be temporary, but it should help you login to see what may be going wrong with your node.
First, download the cloud image that corresponds to the architecture of your node. The Images page of the web UI lists the images currently being cached by MAAS:
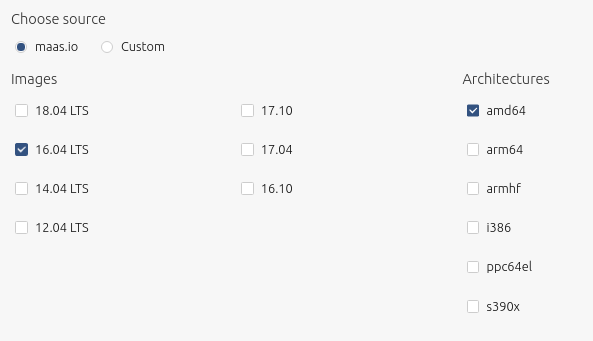
Images can be downloaded from https://cloud-images.ubuntu.com/↗.
For example:
wget https://cloud-images.ubuntu.com/xenial/current/xenial-server-cloudimg-amd64-root.tar.gz
With the image downloaded, extract its contents so that the shadow password file can be edited:
mkdir xenial
sudo tar -C xenial -xpSf xenial-server-cloudimg-amd64-root.tar.gz --numeric-owner --xattrs "--xattrs-include=*"
NOTE:
sudo is required when extracting the image filesystem and when making changes to the files extracted from the image filesystem.
Now generate a hashed password. Use the following Python 3 command, replacing ubuntu with the password you wish to use:
python3 -c 'import crypt; print(crypt.crypt("ubuntu", crypt.mksalt(crypt.METHOD_SHA512)))'
Output from the previous command looks like the following:
$6$AaHblHl5KGrWBmPV$20ssynyY0EhcT9AwZgA2sTdYt4Bvd97bX7PjeyqVLKun2Hk3NBa8r7efM2duK7pi2dlnd5tG76I0dTUvjb6hx0
Open the xenial/etc/shadow file extracted from the image with a text editor and insert the password hash into the root user line of etc/shadow, between the first and second colons:
root:$6$AaHblHl5KGrWBmPV$20ssynyY0EhcT9AwZgA2sTdYt4Bvd97bX7PjeyqVLKun2Hk3NBa8r7efM2duK7pi2dlnd5tG76I0dTUvjb6hx0:17445:0:99999:7:::
Save the file and exit the text editor.
Recent versions of MAAS use SquashFS to hold the ephemeral image filesystem. The final step is to use the following command to create a SquashFS file called xenial-customized.squashfs that contains the modified shadow file:
sudo mksquashfs xenial/ xenial-customized.squashfs -xattrs -comp xz
The output should look like the following:
Parallel mksquashfs: Using 2 processors
Creating 4.0 filesystem on xenial-customized.squashfs, block size 131072.
[=======]  2516/26975   9%
You now have an ephemeral image with a working root login that can replace an image locally cached by MAAS.
Images are synchronised by the region controller and stored on the rack controller in /var/lib/maas/boot-resources/, with the current directory linking to the latest synchronised images.
For example, the latest low-latency Ubuntu 16.04 image can be found in the following directory:
cd /var/lib/maas/boot-resources/current/ubuntu/amd64/ga-16.04-lowlatency/xenial/stable
To replace the original, substitute the squashfs file with the custom image generated earlier, making sure the new owner is maas:
mv squashfs squashfs_original
cp /home/ubuntu/xenial-customized.squashfs .
chown maas:maas squashfs
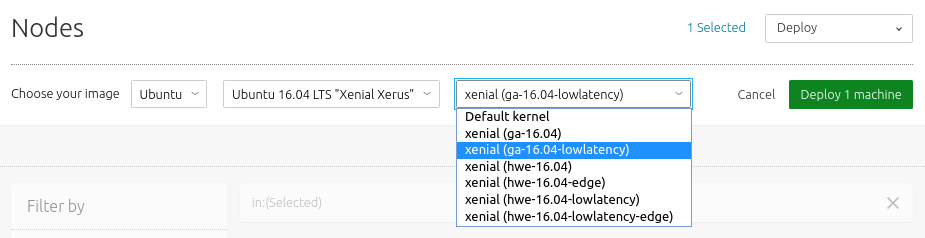
You can now use this image to commission or deploy a node and access the root account with the backdoor password, such as by deploying the same specific image from the web UI to the node you wish to troubleshoot.
Migrating an existing snap installation
If you’re currently running MAAS from a snap in all mode, you can easily migrate your database to a local PostgreSQL server with the following command:
sudo /snap/maas/current/helpers/migrate-vd Snapatabase
This will install PostgreSQL from the archive and migrate the MAAS database to it.
Note that if PostgreSQL is already installed on the machine, the script will move the current datadir out of the way and replace it with the one from the snap, after confirmation with the user. If you want to keep the current database set and just import the MAAS database, you’ll need to perform a manual dump/restore of the MAAS database, explained below.
The migration script will automatically adjust the snap configuration to use the new database. Note, though, that the target database must be at least the same version level as the one currently used in the snap (PostgreSQL 10). Consequently, the migration script only supports Ubuntu 18.04 (bionic) or later.
Manually exporting the MAAS database
If you want to export the database from the snap to an already setup PostgreSQL server, possibly on a different machine, you can manually export it from MAAS as follows. With MAAS running (as this ensures access to the database), run:
export PGPASS=$(sudo awk -F':\\s+' '$1 == "database_pass" {print $2}' \
    /var/snap/maas/current/regiond.conf)
sudo pg_dump -U maas -h /var/snap/maas/common/postgres/sockets \
    -d maasdb -F t -f maasdb-dump.tar
This will produce a binary dump in maasdb-dump.tar. You can then stop the MAAS snap via
sudo snap stop maas
Before importing it to the new database server, you need to create a user and database for MAAS:
sudo -u postgres \
    psql -c "CREATE USER maas WITH ENCRYPTED PASSWORD '<password>'"
sudo -u postgres createdb maasdb -O maas
Also, make sure that remote access is set up for the newly created maas user in /etc/postgresql/10/main/pg_hba.conf. The file should contain a line similar to:
host maasdb maas 0/0 md5
Be sure to replace 0/0, above, with the proper CIDR to restrict access to a specific subnet. Finally, you can import the database dump with:
sudo -u postgres pg_restore -d maasdb maasdb-dump.tar
To finish the process, you’ll need to update the MAAS snap config to:
- update the database config in
/var/snap/maas/current/regiond.confwith the properdatabase_hostanddatabase_pass - change the content of
/var/snap/maas/common/snap_modefromalltoregion+rack
Using a local PostgreSQL server is a little bit of work, but it provides great benefits in terms of MAAS scalability and performance.
Here are some jq recipes to get some human-readable output from the MAAS CLI.
This recipe, which we keep in a file called jqml.sh, prints a basic machine list
#!/bin/bash
maas admin machines read | jq -r '(["HOSTNAME","SYSID","POWER","STATUS",
"OWNER", "POOL", "VLAN","FABRIC","SUBNET"] | (., map(length*"-"))),
(.[] | [.hostname, .system_id, .power_state, .status_name, .owner, .pool.name,
.boot_interface.vlan.name, .boot_interface.vlan.fabric,
.boot_interface.links[0].subnet.name]) | @tsv' | column -t
For this to work, you need to only break lines in the jq string (‘…’) or add backslashes if you break outside that boundary.
Machine list with first tag added
It’s a good idea to keep your most important machine tag first, as it’s the first one you’ll see. It makes scanning your list (UI or CLI/jq) much more efficient. Here’s a recipe that adds the first tag to the console-printed machine list. We keep it in jqmltag.sh, but of course, you can call it whatever you want.
 #!/bin/bash
 maas admin machines read | jq -r '(["HOSTNAME","SYSID","POWER","STATUS",
 "OWNER", "TAGS", "POOL", "VLAN","FABRIC","SUBNET"] | (., map(length*"-"))),
 (.[] | [.hostname, .system_id, .power_state, .status_name, .owner // "-",
 .tag_names[0] // "-", .pool.name,
 .boot_interface.vlan.name, .boot_interface.vlan.fabric,
 .boot_interface.links[0].subnet.name]) | @tsv' | column -t